Wednesday, 19 August 2015

SharePoint:How to truncate the text in multiple lines of text field and add a link for full text

Sometimes the text in multiple lines of text field in SharePoint lists are just too long to show. So here I am going to explain how we can reduce the number of characters shown with a link to show the full text.

We can use content editor web part and JavaScript to show only limited number of characters with a hyperlink to show the full text. Below is my list with long texts in multiple lines of text field :

As you can see it's really huge! That's the reason why we have to truncate the text. Here is the plan (I am going to explain each step in detail later in this blog.):
  • First check using the developer tool in browser what is the class name of the HTML tags that's holding the long text.
  • Then write a JavaScript program to get the long text inside that tag, truncate it and then finally add a link to show full text.
  • Next step is to add the Content Editor web part and paste your code in it and save the page.
That's it. No magic. No headache. It's simple.

Checking The Anatomy of SharePoint Page

To be able to truncate the text first we need to get the text. If you don't know how to use developer tool in browser don't worry. Press F12. You should be able to see the tool like this :

Then click on the arrow(in case of IE it's arrow but in chrome it's magnifying glass) and the click on part of the page you want to inspect, in this case the long text. This will show you the tags inside which the text resides. Like this :
  In my case it's inside 'div' with class name "ms-rtestate-field" inside which there is one more 'div' tag with dynamic class name and so on. Please note that in your case it might be little bit different. So modify the JavaScript that I will provide below accordingly.

Cook The JavaScript
Next step is to write JavaScript. Here is the JavaScript :

<script>
window.texfull = "" ;
window.onload = function()
{
   var tds = document.getElementsByTagName("td");
   for(var m=0; m<tds.length; m++)
   {
       if(tds[m].className == "ms-cellstyle ms-vb2")
      {
         var cell = tds[m];
         var cellChilds = cell.childNodes;
         for(var i=0;i<cellChilds.length;i++)
        {
             if(cellChilds[i].className =="ms-rtestate-field")
            {
                var div = cellChilds[i].childNodes[0];
                if(typeof div !== 'undefined')
               {
                    var text = div.innerHTML;
                    if(text)
                   {
                        if(text.length > 100)
                       {
                            textfull = div.innerHTML;
                            text = text.substring(0,100) + "<a href='javascript:alert(textfull);'>...more</a>";
                            div.innerHTML = text;
                       }
                 }
              }
          }
      }
    }
  }
}
</script>

NOTE: I have used here document.getElementsByTagName to get all 'td' tags and then iterating through all the tags to find a 'td' tag with class name "ms-cellstyle ms-vb2" which holds the text in my case. We could have used "getElementsByClassName" but unfortunately it doesn't work in IE8 or below. So I had to do it like this.
Here I have written code to show the full text as an alert on user clicks on the "...more" link. You can write the URL of the DisplayForm to show item.

Add The Web Part
Then next step is to add a content editor web part to your page. To do that :
  • Go to setting and click on Edit Page.
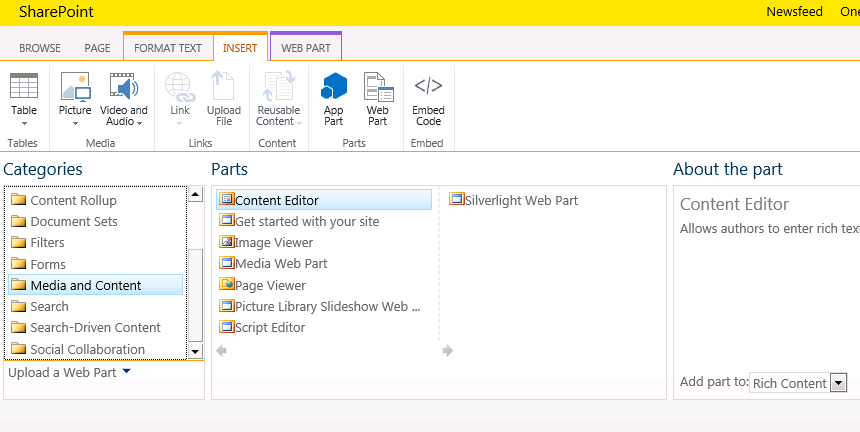
  •  Click on Insert Web part and then select Content Editor inside Media and Content.

  • Click on Add button. 
  • Then select the Content Editor web part and click on Edit Source button on ribbon on top to add you code.
  • Then save the page and watch the magic happen.

If you face any problem don't hesitate to leave comments. Enjoy!

Saturday, 18 July 2015

Android : Eclipse emulator not starting up (or not found)

While working on Android projects frustrating things do happen. Like the problem with emulator. While ADT is an excellent add on for Eclipse it has one small problem, that is some times emulator doesn't start up. While I am still looking for the reason and permanent solution, I found a temporary solution.
  • Run the CMD
  • Then change the location of command prompt to the location to : path_to_sdk\sdk\platform-tools. For example if your sdk is installed in 'D' drive then your path should be : D:\sdk\platform-tools. To run cmd from this location first type "D:". This should change your default location to D:\>. Next type "cd sdk\platform-tools".
  • The reason why we had to perform the above step is that we have to run adb command.
  • The reason why emulator doesn't start up is because it is not connected to adb so you can verify if you have the same problem by running following command : adb devices. If your device doesn't show up follow the below steps, if it does show up  and still you have the problem it is probably some other issue.
  • Run the following command : adb kill-server
  • Then run : adb start-server
  • Then you can run : adb devices to check if your desired emulator is now connected to adb or not.
Hope this helps some troubled soul like me in future.

Saturday, 18 April 2015

SharePoint List View Threshold

Hello Readers!
In this post I am gonna tell you about SharePoint list view threshold.

List View Threshold

List view threshold is a feature in SharePoint that allows you to limit maximum number of items that can be returned in a query for a list or library. When you understand list view threshold properly you will realize that its your friend not your foe. List view threshold is in place to improve the performance of SharePoint. The default value of list view threshold is 5000 items. Now you may ask why 5000?? What's so special about it? To answer this question we need to go to the back end. SharePoint stores all the data of a site collection in one table called AllUserData. And SQL Server locks a table if the query result exceeds 5000. So if you click on a list view which has more than 5000 items SQL Server will lock the AllUserData table till your query is finished. Till that time all the other users that may be trying to access data in other lists or libraries will have to wait. It's not just this. If you increase the list view threshold then the number of requests that SharePoint can handle decreases drastically.

Still sometimes it becomes necessary to increase the list view threshold limit till you find some permanent solution. You can do that by going to Central Admin --> Manage Web Application --> select your web application --> General Settings --> Resource Throttling.
But remember this is not permanent solution. There are few ways in which you can solve the puzzle of list view threshold. One is that you can create views and apply filters to limit the number of items returned for that view. But we know its not possible every time. So other solution is to move the items into folders on some basis of some categories. For example you can move documents into the folders of years and months according to their Created By date. In my next blog post I will explain how you can move large number of list items into folders using PowerShell Script.

Stay Tuned!

Sunday, 12 April 2015

PowerShell : Regular Expressions

Greetings people of Earth!

In this article we will discuss about Regular Expressions in PowerShell. Those who have watched Interstellar movie already know that in some situations time becomes precious for us like any other resources. We have to save it! And those who have been in a situation where our dear and kind boss shouts at us "why is this not done?", "why is your program taking so long to run?", "What kind of shit code have you written", know even better the value of time. And that's why I am writing about Regular Expressions.

The beauty of regular expression is that its faster than other string searching or matching methods. But it might seem complicated if you don't understand them. But once you understand them, they become your best friend. Now you may ask why is it faster?
Regular Expressions are faster because they use smarter algorithms like Boyer-Moore string search algorithms. It doesn't go through the whole text matching all the characters with the pattern. It skips characters in between which improves the performance. If you want to learn more on that you can visit the link above.

Before diving into regex functions let's take a look into some basic symbols you will come across.

         
          SYMBOL                  
                                       MEANING                                           
               \ used to instruct compiler not to consider any special meaning of the next character.
               * represents 0 or more characters. Ex- a*
               + represents 1 or more characters. Ex- a+
               ? represents 0 or 1 character. Ex- a?
               . match any character except newline.
               [] match any single character from within the brackets. you can also specify range like [a-z] or [0-9]
               [^] match any character except those in brackets.
               ^ represents the beginning of a line. Ex- ^ab matches 'ab' in the beginning of newline.
               $ represents the end of line.
               {n,} used to represent a pattern repeated n or more number of times.
               {,n} used to represent a pattern repeated n or less than n number of times.
               {n} used to represent a pattern repeated exactly n of times.

These are some symbols you will find more often while working with regular expressions. Now I will show you some examples of regular expressions. I would suggest you to first think yourself to form a regex before looking into pattern I have given.

    - apple is a fruit apple
suppose you want to remove the second 'apple' then your regular expression would be "apple$"

$string = "apple is a fruit apple"
$string = $string -replace "apple$" , ""

    - CN=Andy/OU=ROY/AP=US
Suppose this is a string from which you want to remove the character before '=' so that resulting string is Andy/ROY/US. 

$string = "CN=Andy/OU=ROY/AP=US"
$string = $string -replace "[A-Z]{2}=",""

write-host $string

This expression replaces 2 alphabets before "=" with a blank.
NOTE : "replace" function is case insensitive so it considers it will consider "cn=" and "CN=" the same.
Suppose our string is : "Cn=Andy/OU=ROY/AP=US"
and you don't want to remove small case letters then you can use below script

$string = "Cn=Andy/OU=ROY/AP=US"
$string = $string -creplace "[A-Z]{2}=",""
write-host $string

This is will give below result :


Suppose the string is :
"C=Andy/OU=ROY/APS=US"
Then you can use the below script :


Here '[A-Z]{1,3}=' matches atleast 1 and atmost 3 alphabets before '='.
Now suppose you have a string like this :
"<body><p attr="some attribute value">some text that you want to retain</p></html>"
This is a scenario that I have faced where a SharePoint column had all junk data like this from source and I had to remove all the unwanted characters. I have simplified the string and kept only html tags to make it simple for you.
You can remove all the html tags with this regex : "<.+?>"


This is the power of regular expressions. The longer your pattern is the faster it works. There are still many types of patterns to discuss. But it's not possible to discuss all scenarios. So if you have any doubts regarding any regular expression feel free to comment below or mail me.
Have a nice day!

Monday, 6 April 2015

SharePoint : Update Managed Metadata Column Using PowerShell

Greetings Readers!
In this blog we will discuss how to update the managed metadata column of a SharePoint site. Those who have worked on it can understand how frustrating it is to try to update it without knowing the proper way. I remember the first time when I had tried to write a PowerShell script to update values of a taxonomy field of document library. I was stuck like anything. But I assure you once you know the correct way to reference a SharePoint Managed Metadata field it becomes very easy.

Here is a sample script showing how to do it.

try{
$siteobj = new-object Microsoft.SharePoint.SPSite("http://your-site-url")
$web = Get-SPWeb "http://your-site-url"
#creating the taxonomy session object
$session = New-Object Microsoft.SharePoint.Taxonomy.TaxonomySession($siteobj)
if($session -eq $null)
{
        Write-Host "Failed to create taxonomy session"
}
#Getting the term (new value) to which we want to update the column
$termstore = $session.TermStores["termstore name"]
$group = $termstore.Groups["group name"]
$termset = $group.TermSets["termset name"]
$term = $termset.Terms["term name"]
#List/Library we want to update
$list = $web.Lists["your list name"]
$taxfield =  $list.Fields["your column"] -as [Microsoft.SharePoint.Taxonomy.TaxonomyField]
foreach($item in $list.Items)
{
      #SetFieldValue function is used to update taxonomy field
      $taxField.SetFieldValue($item,$term)
      $item.SystemUpdate()
}
}
catch
{
      write-host $_.exception
}

Finally
{
        if($web -ne $null)
        {
              write-host -ForegroundColor Green "Disposing the web Object.."
              $web.Dispose()
        }  

}

You can make an input xml file from where you can read the values and do it for multiple site collections in one run. Now you can see how simple it is to update the taxonomy fields. In the end we have used SystemUpdate() function to preserve the metadata of the item like modified, modified by etc. If you don't want then you can use Update or UpdateVersionOverwrite. If you are not sure which one to use visit my previous blog where I have explained their differences. If you have any queries you can leave comments or mail me. Now it's time for a SharePoint fact.
--------------------------------------------------------------------------------------------------------------------------

FACT : We all know SharePoint web parts. We can add a web part to a page in a web part zone or outside it. So you will ask what's the difference? The difference is that if you add a web part in web part zone, the properties of that web part are stored in content database and users can view and edit it through browser. But if web parts are added outside the web part zone then it is stored in the aspx page and users can't edit it through browser. They can only see it. So add wisely!

Thursday, 19 March 2015

How to hide SharePoint list group by labels

Hello Reader! Hope you are fine.
In this post I am going to tell you a very nice and easy trick to hide the group by labels or headings in grouped SharePoint list view. I don't know if you have faced such requirement yet but trust me there is a huge possibility of it. It is weird though isn't it? Why would you even want to hide it? If you have applied a group by why would you want to hide it? I don't know about you guys but the first thing that came to my mind is this. But anyways we have to do what our 'kindhearted' and 'soft-spoken' boss wants us to do. So lets start our mission!

There are 2 ways of doing it . One is to use CSS and other is using JavaScript. I'll be using JavaScript here because that's more flexible and you know that's what I do... provide you better solutions ;-).
Okay lets get serious now. We will use JavaScript in content editor web part to achieve our target.

First step is to note down the class name of the group by labels you want to hide. You can find it out using developer tools in our browsers.
How to find a page element
  • Simply press F12 and you can see a small pane with page source.
  • Then select the element (group by label) to find it in page source. If you don't know how to select an element don't worry. For Internet Explorer click on the button with arrow symbol on top left corner. Or in Google Chrome click on the button that looks like a magnifying glass, then click on the element on page that you want to find on the page source.
  • Now find the class name of the group by labels. It may look something like "ms-gb". It will be same for all the labels through out the page.
Now that we have the class name of the elements we want to hide, we can proceed further.
Add a Content Editor Web Part to your page(where you want to hide labels).

How to add Content Editor Web Part
 
Steps to add a Content Editor web part :
  • Click on the site settings button.
  • Click on 'Edit Page'.
  • Click on 'Insert' in Ribbon on top.
  • Click on Web Part.
  • Select 'Media and Content' from category of web parts.
  • Then select Content Editor and click Add button.

Next click on the Content Editor web part and then click on 'Edit Source' on top.


Then you can write your code in a box that pops up. You can write this code to hide the group by labels :

<script language="javascript">
window.onload = function ()
 {
var myele = document.getElementsByClassName('ms-gb')
for(var i=0;i<myele.length;i++)
{
myele[i].style.display="none"
}
// if you have more that one group by condition 
var myele1 = document.getElementsByClassName('ms-gb2') 
for(var i=0;i<myele1.length;i++)
{  
myele1[i].style.display="none"
}
}
</script>

I must warn you this may cause flickering on screen. By flicker I mean the group by labels would be first visible for a second or so then it will disappear. This may not look so good. But only way that I know of to avoid this is to use CSS in page source. But editing the page source cannot be an option always. Like in my case it wasn't an option (so I had to live with it) because 1--> It was client's site   2--> If you hide it using CSS in page source it will hide the labels in all the pages of the list view. I'll explain this.

In your SharePoint list if you have folders or document sets on first level and then data inside it, CSS in page source or the JavaScript I have written above will hide the labels in all the levels(i.e for the items inside folders also). If you want to hide it only in say, first level you have to tweak the code. You have to differentiate the first page of the list from other pages (pages that come after clicking on folders) in your code. Now you understand why I had said earlier JavaScript is more flexible approach?
If you look closely when you click on a folder in your list, it doesn't go to a new page, it just adds parameters to it. For example if your list URL is something like this - https://servername/sites/sitename/mylist.aspx , then clicking on folder will take you to "siteurl/mylist?RootFolder=%something%". So I thought of a simple way to apply the script only on first page.
Use the JavaScript 'slice' function to get the last part of the URL.

<script language="javascript">

window.onload = function ()
 {

var url = document.URL          //considering your list url is the one given above
var lastpart = url.slice(-11,-1)  //this returns mylist.asp (without the 'x')
if(lastpart == "mylist.asp" || url.indexOf('mylist.aspx?View')>0)
 {
  var myele = document.getElementsByClassName('ms-gb')
  for(var i=0;i<myele.length;i++)
  {
   myele[i].style.display="none"
  }
  var myele1 = document.getElementsByClassName('ms-gb2')
  for(var i=0;i<myele1.length;i++)
  { 
   myele1[i].style.display="none"
  }
 }

</script>

We have used "url.indexOf(''mylist.aspx?View)>0" because when you go back to first page of list from inside of any folder by clicking on bread crumb link of list on top it appends '?View' to the URL.

Finally I would like to mention that if you have multiple lists where you want to implement this you don't have to place this code in content editor in each of the pages. You can write your code something like :

<script language="javascript">

window.onload = function ()
 {
var url = document.URL
if(url.indexOf('mylist.aspx') > -1) // to identify if
{

 var lastpart = url.slice(-11,-1)
 if(lastpart == "mylist.asp" || url.indexOf('mylist.aspx?View')>0)
 {
    var myele = document.getElementsByClassName('ms-gb')
  for(var i=0;i<myele.length;i++)
  {
   myele[i].style.display="none"
  }
  var myele1 = document.getElementsByClassName('ms-gb2')
  for(var i=0;i<myele1.length;i++)
  { 
   myele1[i].style.display="none"
  }
 }
 }
else if(url.indexOf(mylist1.aspx') > -1)
{
 var lastpart = url.slice(-12,-1)
 if(lastpart == "mylist1.asp" || url.indexOf(mylist1.aspx?View')>0)
 {
  var myele = document.getElementsByClassName('ms-gb')
  for(var i=0;i<myele.length;i++)
  {
   myele[i].style.display="none"
  }
  var myele1 = document.getElementsByClassName('ms-gb2')
  for(var i=0;i<myele1.length;i++)
  { 
   myele1[i].style.display="none"
  }
 }
 }

</script>

Then you can paste this code in a text file(.txt) and upload it in style library (in Site Contents) of your top level site (not in subsite) . Then paste the link of this txt file in content link of content editor.
  • Click on Edit page
  • Click of content editor Edit Web Part
  • paste the link of the text file with script in content link.
  • Click OK.
After this the Content Editor web part gets the code from the file in style library. Its a better way to manage your codes.

SharePoint Facts

SharePoint 2013 came with a lot of new features. One of them is "Device Channels". It was introduced to enable users to view SharePoint sites in mobile devices like smart phones, tablets etc.
You can create different device channels for different devices and specify different master pages or CSS files for different devices. It matches the 'User Agent' substring that comes with a Http request from device browser with the device channels User Agent substring that we provide in inclusion rule like "windows phone OS" etc and applies the CSS file for that device. Pretty cool right?

Friday, 13 March 2015

SharePoint : Update() vs SystemUpdate() vs UpdateVersionOverwrite()

As Arnold in 'The Terminator' I am back as a savior but ofcourse with SharePoint solutions. Today I will tell you the difference between 3 little methods to update a SharePoint list item that often confuse people new to SharePoint. It confuses because all the three functions have same basic functionality i.e. update an item. Then how to decide which one to use? Below are the differences :

                 Update                                SystemUpdate                              UpdateOverwriteVersion        

Updates the item in database


Updates the item in database

Updates the item in database

Updates the 'modified' and 'modified by' value

Doesn't change the 'modified' and 'modified by' fields. Updates the 'modified' and 'modified by' value

Creates a new Version

Doesn't create a new version Doesn't create a new version

NOTE : While working on one of such requirements (in SharePoint 2013) I have found out that UpdateOverwriteVersion doesn't increment the minor versions but if the version of an item is a major it increments its version. For example if your item version is 2.0 it may change it to 2.1. If you are not okay with that you can use SystemUpdate. If you want to preserve the metadata i.e. if you want the "modified" and "modified by" fields to remain unchanged you can add these to lines to your code :

$item["modified"] = $item["modified"]
$item["modified by"] = $item["modified by"]

(For SystemUpdate you don't have worry about it. But if these 2 fields are getting updated you can preserve it like this.)
what it does is keeps your field values unchanged. If it doesn't work you can try it with $web.AllowUnsafeUpdate=$true. After you are done with all the changes you can set it to false. 'AllowUnsafeUpdate=$false' protects you from cross site scripting.

Okay... this is all I had to say on this topic. I have decided to feed you with some interesting facts about SharePoint at the end of every article from now on.

FACT : In SharePoint a list or library item can only occupy a maximum of 8000 bytes in content database out of which 256 bytes are reserved for built-in columns.